Salty Sam’s Fun Blog for Children
Number 293
Hot Air Ballooning
Hello Everyone

As an adventurer, l am always keen to try any form of transport to travel far and wide.
One of the more unusual forms of transport l have used to get around is a hot air balloon.
Some enormous balloons floated past my lighthouse this week and it made me think that this would be a really good topic to write about for you in my post.
A hot air balloon is a very simple craft but looks magnificent flying through the sky.
lt consists of a bag filled with heated air, this is sometimes referred to as an envelope, and beneath it is suspended a large container for people to stand in.
This is often a wicker basket, or sometimes an aluminium box, which is referred to as a gondola.
When people go on really long balloon rides, they use an enclosed capsule so that they can be protected from the weather. Flying at high altitudes can be really cold. The balloons are able to cope with cold but the people may not fare so well!
The gondola also carries a heater pointed at the bottom of the balloon and probably some spare gas canisters to feed the flame that heats the air inside the balloon.
The balloon is made from nylon or polyester because it is strong but very light, but the fabric close to the burner is made from fire-resistant materials. The balloon will have one or more heaters (or burners) and they are fuelled by propane gas.
You can also get solar-powered balloons.
Before take off, the balloon is partially inflated by cold air blown in by a fan while it is lying on the ground – before the air in the balloon is heated.
To have fun, many people have balloons that are made as strange shapes like animals or people or objects. Some companies use this idea to advertise their products.
Chinese lanterns work on the same principle of using hot air to create flight.
Hot air rises and this is what creates lift.
At the top of the balloon there is a covered hole about 30cm across that can be partially opened to let hot air out. This causes the balloon to drop.
This flap is controlled by a cord reaching down to the pilot in the basket.
Some balloons have side vents as well to allow the balloon to twist in mid-air.
So a balloon pilot can choose to go up or down. lf ballast is carried, like bags of sand, it can be dropped and the loss of weight will also cause the balloon to lift.
Movement sideways, however, is largely dependent on the wind direction.
This is why any pilot is limited as to where they can go on any day – and other types of aircraft were invented after the first attempts to fly in balloons in the late 1700s.
ln the 1920s, many airships were built. They were huge balloons filled with hydrogen and powered by an engine. They could even fly right across the Atlantic. But hydrogen is very flammable and after several terrible disasters people were reluctant to fly in them anymore.
The Hindenburg was the longest airship built before the Second World War at 246.7m long. lt ferried many people backwards and forwards between Europe and America offering high luxury in its passenger quarters. But it burst into flames on landing in 1937 killing 36 people. Because the crash was filmed it had a huge impact on the minds of potential, future customers.
Of course ballooning is still popular as a recreation.
One of the wonderful things about ballooning is that as you fly through the air you don’t hear the wind rushing past you because you are travelling with the wind. And you are travelling at the same speed as the wind too.
Strangely, the wind can be blowing in different directions at different altitudes (heights) and so the pilot will make the balloon go up or down in order to get into a different wind.
On very rare occasions, a pilot may be able to land back at a starting point because of this phenomenon.
Of course, it is very important to check the weather forecast before you fly so that you can plan your journey properly.
Balloons often have a ground crew and they travel with the balloon in a chase vehicle on the ground. The two parties communicate using two-way radios.
Generally, balloon races test accuracy rather than speed. The goal is to land as near to a target as possible.
Some people attempt to travel many miles even managing to fly around the world.
This takes many days.
Some people like to see how high they can fly in a balloon instead.
Balloon rides across game reserves are popular too because the silent travel of the balloon does not disturb the animals.
Everything looks different from above, especially trees and houses.
Trees look like big broccoli plants and the roof tops that you can’t see from ground level look very large.
Balloons nowadays are kitted out with instruments to help a pilot, like an altimeter which tells you how high you are off the ground and even GPS. But as with any other aircraft there is risk when flying. Power lines can be a problem for example.
Some people buy their own balloons and some fly with clubs.
lt is possible to fly with a company that offers balloons rides as well.
The best time to fly in a hot air balloon is in the early morning or two or three hours before dusk when the wind is at its calmest and the air is cooler with less turbulence.
But if you don’t like heights, going to a balloon festival like the one in Bristol every summer to watch dozens of balloons taking off can be spectacular!
lf you decide to go, l hope you have a great time.
Bye bye everyone – don’t forget to subscribe to my blog!
lf you like my blog, please support it by telling all your friends and followers about it.
Thank you!
And see you again next Fun Friday!
Love and kisses
Salty Sam

www.christina-sinclair.com

Bill and Bob’s Joke of the Week![]()
![]()
Bill: Why did the idiotic pilot land his hot air balloon on the roof of a house?
Bob: l don’t know. Why did the idiotic pilot land his hot air balloon on the roof of a house?
Bill: Because the people in the house had left their landing lights on!
Salty Sam © Christina Sinclair 2015
Unauthorized use and/or duplication of material from this blog without express and written permission from this blog’s author and owner is strictly prohibited.
Links may be used to www.christina-sinclair.com

Picture Gallery


 THE SALTY SAM NEWS DESK

Last Saturday, Mr Crackenthorpe took his Beaver Scouts on a long hike through the woods.
When they found a clearing to sit down in and have a rest.
There Mr Crakenthorpe showed the boys how to make some knots.
He said that probably the most useful one to learn would be a reef knot.
It is easy to do but useful in so many situations if done properly!
It is simply left over right and right over left.
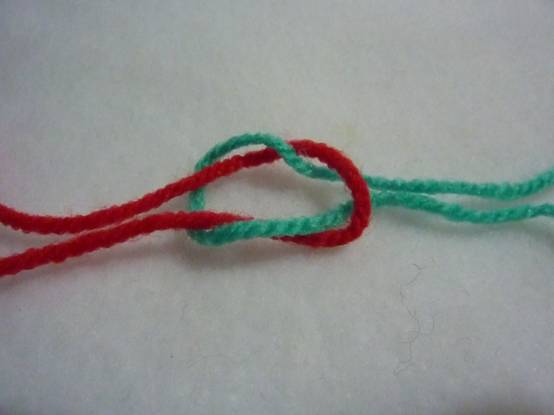
Because the knot pulls against itself it makes it very strong.
Can you see how it’s done?
Once they had mastered this knot he would teach them more complicated ones.


*********************
TO ADVERTISE ON THIS BLOG
PLEASE CONTACT:
christina.sinclair.ads@aol.co.uk
*********************


Quick Quiz
What do these idioms mean?
- A square peg in a round hole
- The other way around
- To drive someone round the bend
- All year round
- Going round in circles


lt’s the Weekend!
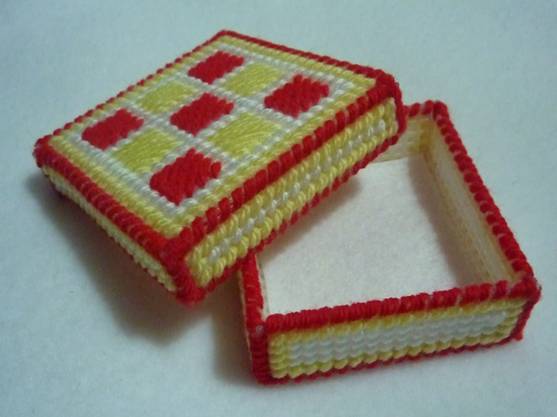
HOW TO MAKE A PLASTlC CANVAS PlNBOX
This pin box matches the needle book on Blog Post 288.
You will need 1 sheet of 7 mesh 10.5 by 13.5 inches/26.7 by 34.3cm
TIP
Be mindful of which way your stitches are laying as you work. They can be in any direction you choose but you should end up with a neat piece of work.
Cut the following panels:-
Outer lid top 19 x 19 holes 1 piece
Outer lid sides 19 x 4 holes 4 pieces
Inner lid top 17 x 17 holes 1 piece
Inner lid sides 17 x 3 holes 4 pieces
Outer base bottom 17 x 17 holes 1 piece
Outer base sides 17 x 6 holes 4 pieces
Inner base bottom 15 x 15 holes 1 piece
Inner base sides 15 x 5 holes 4 pieces
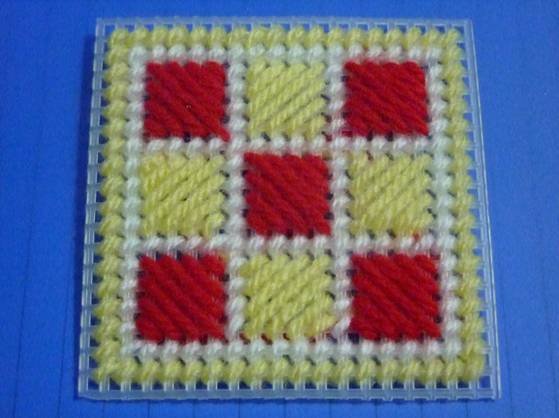
Pinbox lid top
- Sew the sides to the top on the inner skin of the lid but do not sew up the corners – using white yarn will make the stitching less noticeable than a darker colour
- Sew the sides to the bottom on the inner skin of the base but do not sew up the corners – using white yarn will make the stitching less noticeable than a darker colour
- Put these two pieces to one side and work canvas work stitches onto the other panels using any colours you like but try to use a darker colour on the edges and corners of the box because these will get the most handling
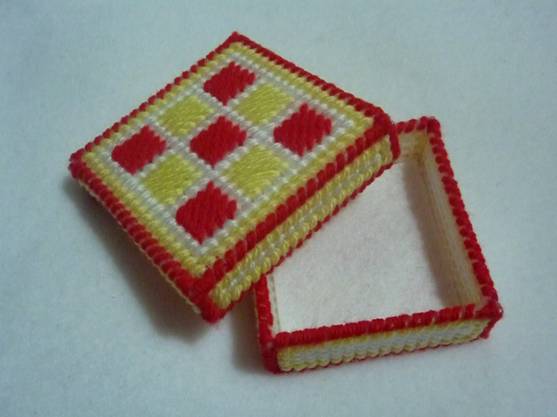
- Embroider the lid top using the photograph as a guide
- Put a border around the side pieces and fill the centres of the panels with tent stitches – in the photograph the border is yellow and the centres are worked in white – 1 line on the lid and 3 lines on the base
- Work lines around the base panel and fill in the centre with a square worked in diagonal lines
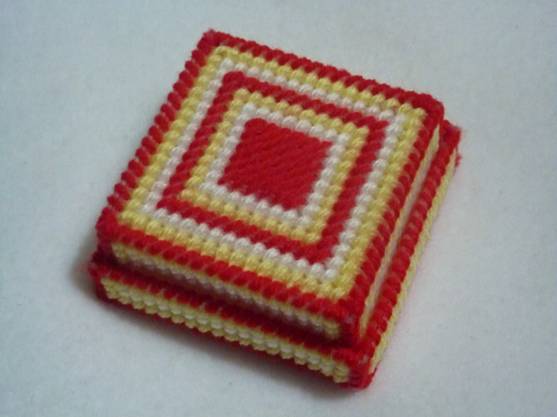
The bottom of the box
TO MAKE UP
- Sew the sides of the lid to the top of the lid then sew up the corners
- Sew the sides of the base to the bottom of the base then sew up the corners
- Push the inner skins into place and sew around the rims of the lid and base – you will only sew into one layer of canvas for one hole at each end of the sides
- If you want to hide the back of your stitch-work on the lid, put a square of felt into the lid before you sew the inner skin in place
- Put a square of felt into the base of the box to make it look plush
Please note that the material on this blog is for personal use and for use in classrooms only.
It is a copyright infringement and, therefore, illegal under international law to sell items made with these patterns.
Use of the toys and projects is at your own risk.
©Christina Sinclair Designs 2015


Quick Quiz Answers
- A square peg in a round hole – it doesn’t fit (like a person doing a job that is not right for them)
- The other way around – transposed facts
- To drive someone round the bend – to be very annoying
- All year round – not seasonal
- Going round in circles – not achieving anything
