

Salty Sam’s Fun Blog for Children
Number 97
The History of Printing
Hello Everyone
Have you ever made potato prints?
That means cutting a shape or letter into a potato, covering the surface with paint and then pressing it down onto the surface of some paper. When you print your potato print many times it will always be the same shape and size.
You notice that if you want to make a letter, you have to make it ‘backwards’ for it to look right on the paper.
When printing was done by hand, all the individual letters had to be put into place by somebody picking them out of trays. These little letters were called movable type.
This might be where the expression ‘to mind your ‘ps’ and ‘qs’’ comes from. A printer learning his trade could easily get the letters around the wrong way if he was not being careful enough.
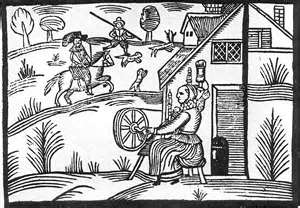
Printing actually goes back 3,000 years or more. ln the beginning people used wood blocks. lt was a bit like potato printing but using carved wood.
These blocks could be used to make pictures or print cloth.
Or printers used cylinders with designs on them that they rolled into soft clay.
And it was also possible to use something called a stencil. This was a design cut out of some sort of stiff material – sometimes stretched over a frame. The paint would be applied over the top of the stencil and the colour would be transferred onto the surface beneath through the shaped holes of the stencil.
(You can do this yourself using thin card. lnterior decorators still used this technique today to make wallpaper, pictures and designs on walls.)
lt wasn’t until much later that people started printing on paper. This was about 600 years ago in Europe.
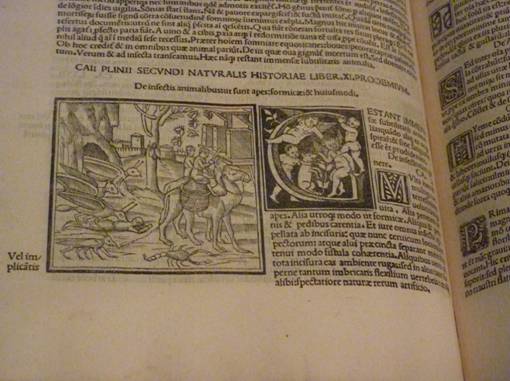
Printers were able to put pictures into books and these pictures were called woodcuts because that is exactly how they were made. The pictures were cut into wood, inked and transferred onto paper. The parts of the wood that were carved away would be the white parts in the picture and the wood that was left on the surface would be the inked part of the picture.
Of course, it was also possible to put pictures on other things like playing cards for example.
Then in 1439, the printing press was invented in Germany by a man called Johannes Gutenberg. This used movable type. That meant letters could be set up to print a whole page at once. Before this, books had to be written by hand and it took a long time to produce a book this way.
Printing had been invented in China a long time before, but their methods had not become as popular as the Gutenberg press system of printing.
The Gutenberg press used metal letters and oil-based inks. They were both longer lasting than the woodcuts and water-based inks that were commonly being used at the time.
The most famous printer in England was William Caxton. He set up a printing press in Westminster, London in 1476. He was the first retailer of English books, and the first book he printed was Geoffrey Chaucer’s Canterbury Tales.
The Bible and other religious books were very popular books of the day.
Another thing was invented at the same time – spelling. Before that people spelled words the way they wanted to. Shakespeare famously spelt his name in fifteen different ways!
The word bread for example could be spelled bredde, brede or breade – none of them wrong!
With the invention of the printing press, books were available to a lot more people and writing became more standardized.
Since then, many kinds of printers have been invented – and more words to learn how to spell!
Bye bye everyone – don’t forget to subscribe to my blog!
Love and kisses
Salty Sam

www.christina-sinclair.com
Bill and Bob’s Joke of the Week![]()
![]()
Bill: Why is the letter ‘T’ important to a stick insect?
Bob: l don’t know. Why is the letter ‘T’ important to a stick insect?
Bill: Because without it, it would be a sick insect!
Salty Sam © Christina Sinclair 2015
Unauthorized use and/or duplication of material from this blog without express and written permission from this blog’s author and owner is strictly prohibited.
Links may be used to www.christina-sinclair.com
Picture Gallery
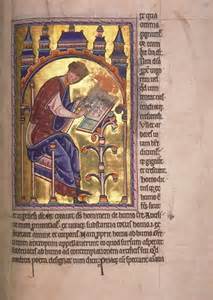
Mediaeval books were written by hand and the pictures were painted onto the pages
They were called illuminated manuscripts
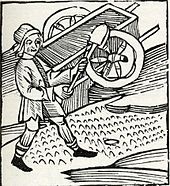 A woodcut (1511)
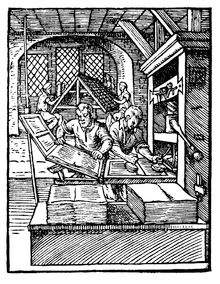
A wood cut showing a printing press (1568)
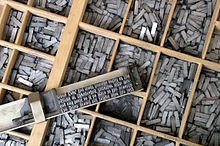 Metal letters in a printer’s tray –
letters were sorted into different boxes and reused again and again on the printing press
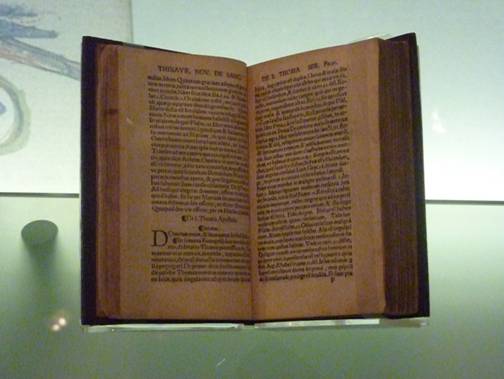
The Lives of the Saints 1537 was a best seller of its day
Over half the books printed at this time had religious themes
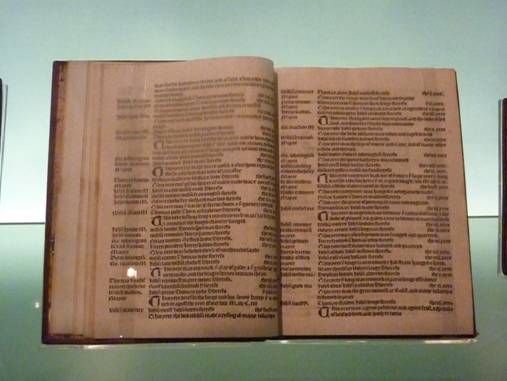 Arnold’s Chronicle 1503 was also known by the title The Customs of London
Printing at first looked like handwriting because that is the only script people of the time would have known
 A stencil to use on a wall or piece of fabric
 THE SALTY SAM NEWS DESK

So Emily, Henry, Bill and Bob decided to make their own cards and gift labels this year.
They bought some stamps with seasonal pictures on and had a great time with paints, glue and glitter!
And we all have a message to all of you – so here is your e-card from all of us…

![]()
![]()
![]()
![]()
![]()
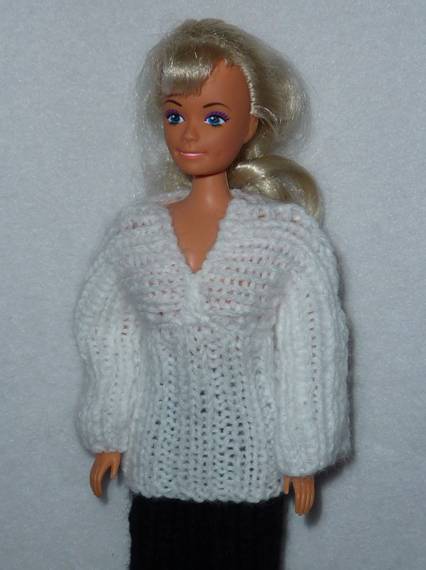
And to add to the theme of my blog post this week, Auntie Alice has made a T-shaped sweater for Emily’s 12” doll. The knitting pattern for the jeans that go with the sweater are on Blog Post 87.
If you get a knitting set or lots of paints and colouring pencils as presents this year, there are lots of ideas for you on this blog – and here are some more…
First, here is the pattern for the dolls’ sweater:-
NEWSDESK MINIMAKE
A 12” DOLL T-SHAPED SWEATER
T-SHAPED SWEATER FRONT AND BACK PANELS (KNIT TWO)
Using 3¼mm knitting needles and white 4ply yarn cast on 20 stitches
K3 (p2,k2) to last 3 stitches, k3
P3 (k2,p2) to last 3 stitches, p3
Repeat the last 2 rows 9 times
Cast off
FRONT OF SLEEVES (KNIT TWO)
Cast on 12 stitches
Knit 34 rows in 1 x 1 rib
Cast off
BACK OF SLEEVES (KNIT ONE)
Cast on 12 stitches
Knit 70 rows in 1 x 1 rib
Cast off
TO MAKE UP
With wrong sides together and using over-sew stitches,
Sew up side seams of panels.
Sew front and back of sleeves together along the top working up from the cuff edge both times until you reach the top of the shoulder (9cm/3¾ inches) and sew up the gap at the front 1cm/½ inch.
Sew along undersides of sleeves incorporating the top of the side panels as you stitch.
Turn right sides out.

*********************
TO ADVERTISE ON THIS BLOG
PLEASE CONTACT:
christina.sinclair.ads@aol.co.uk
*********************

Crafty Tip
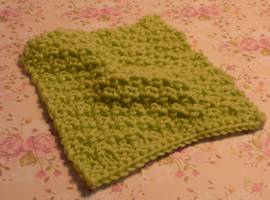
This is an easy pattern to make a blanket/throw to put on a bed in your dolls’ house.
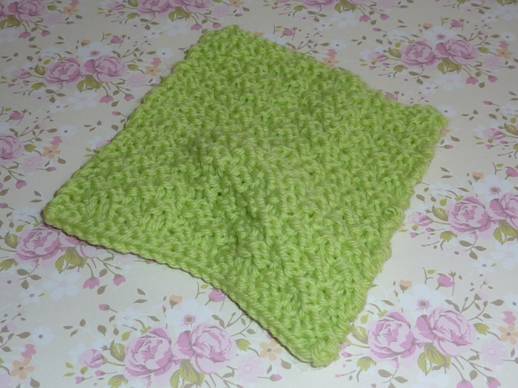
The pattern creates little blocks on the blanket to keep it flat in a way that stocking stitch would not. This pattern is called box stitch.
DOLLS’ HOUSE BLANKET (KNlT ONE)
Using 3¼mm knitting needles and 4ply yarn
Cast on 24 stitches
Knit 2 rows of garter stitch
Sl1 k2 p2 k2 p2 k2 p2 k2 p2 k2 p2 k2 k1
Sl1 p2 k2 p2 k2 p2 k2 p2 k2 p2 k2 p2 k1
Sl1 p2 k2 p2 k2 p2 k2 p2 k2 p2 k2 p2 k1
Sl1 k2 p2 k2 p2 k2 p2 k2 p2 k2 p2 k2 k1
Repeat the last 4 rows 9 times
Knit 2 rows of garter stitch
Cast off
TlP
lf you are a knitting newbie, you can use garter stitch instead.
BLOW MY FOGHORN!!!
PLUS
Salty Sam fans can join in with their comments and share them with children all over the world. You will need permission if you are not an adult.
Enter your e-mail address to subscribe to my blog and receive new Salty Sam Blog Posts for free by e-mail every week. Your address will be kept private and will not be shared with any third party.
Sign me up at the side bar

lt’s the Weekend!

HOW TO MAKE A STENClL
You will need some thin card (card from a cereal box will be fine)
A pencil
A pair of scissors
A few sheets of kitchen paper
Some little trays to put paint in (trays that had vegetables from the supermarket are fine)
Different colour paints
Drawing paper
*Always put down lots of newspaper to work on before you start painting. It is probably better to work in the kitchen.
- Using a piece of thin card draw on the design that you want to use.
- You can draw your own picture, print one off the internet, trace one from a book or magazine or draw around a picture cookie cutter and then draw some detail inside the shape.
- Shade in the parts that you will want to cut out.
- If any of these shapes are really big, you will need to create what are called ‘bridges’. These are bands of card that go across holes which will hold your stencil together in one piece!
- Look at your stencil carefully and make sure that any card left after cutting will be attached to all the other pieces of card.
- When you cut out the holes, put your scissors in the middle of the shape and work outwards – this will give you neater edges (if you are old enough you might be able to use a modelling knife).
- Lay your stencil on a piece of paper to have a practice – do not start painting your bedroom wall without permission.
- Tape the corners down (with masking tape if you have it) so that the stencil won’t move.
- Load a thick, stubby brush with paint.
- Stab it into a pad of folded up kitchen paper a few times because it shouldn’t be too wet and overloaded with paint when you use it on the stencil.
- Stipple (stab) the paint onto the holes where you want the colour e.g. green leaves and red cherries.
- Or you can paint inside the holes with solid colour but again your brush should not be overloaded with paint otherwise the colour will run under the stencil and your edges will not be neat.
- Hold the stencil down with your fingers as you work – it shouldn’t slip if you have taped it down properly.
- When all the holes have been filled with colour you can remove the stencil from the paper and leave the paint to dry.
- The stencil can be used over and over to create repeat patterns.
TIP
When you are older you will be able to use stencils on walls or fabric.
You will need the appropriate paint for these surfaces.
- If you want to spray paint onto walls or fabric to get an effect where the colours ‘mist’ into each other, you will need several stencils for each picture – one for each colour you want to use.
- The pieces of card should all be the same size and you should mark the place where the corners are positioned when the first stencil is used so that the next stencil can be placed in the same position – this way that all the pieces of the picture will fit into place.
- So for example, if you want a picture of a pink rose on your wall, you can draw the rose on two pieces of card – cut out the holes in the flower in one and the leaves in the other.
- Spray different shades of pink on the card with the flower cut out of it and then different shades of green on the card with the leaves cut out.
- The closer you hold the paint sprayer to the surface the denser the colour will be.
- Don’t have your design too close to the edge of the card so that the paint sprays over the edge.
- Mask the wall around the stencil with newspaper taped up with masking tape if you are worried about accidently spraying in the wrong place.
- Ready-made stencils can be bought.
Please note that the material on this blog is for personal use and for use in classrooms only.
It is a copyright infringement and, therefore, illegal under international law to sell items made with these patterns.
Use of the toys and projects is at your own risk.
©Christina Sinclair Designs 2015

ChildLine is a private and confidential place for you to talk. This means that whatever you say, stays between you and ChildLine.
You don’t even need to give your real name if you don’t want to.
If you have a problem and you want to talk to someone please telephone.
The calls are free. (This is a British telephone number.)
Calls to this number will not be listed on a telephone bill.
I believe in the 80/20 rule. you know, where 80 of all reward comes from 20 of the effort? Well, I believe your blog is that 20. I’ve added you to the list of sites that I frequent. Thank you for the in depth and detailed blog posts. Not many people are willing to do that anymore.
l understand what you mean about the Pareto Principle and it is true that l do spend a lot of time creating my blog posts. Thank you very much for your comment Pete.
I would like to thank you for the efforts you have put in writing this blog.
You’re very welcome. Thank you for writing in. 🙂
Wow! This could be one particular of the most beneficial blogs We have ever arrive across on this subject. Actually Great. I am also an expert in this topic so I can understand your effort.
Thanks Val!
Hello there, I found your site via Google while looking for a related topic, your site came up, it looks good. I have bookmarked it in my google bookmarks.
Thank you very much for writing in Buck.
l hope to see you again next Fun Friday then!
My husband and i felt so peaceful when Raymond could round up his homework via the precious recommendations he got from your own web pages. It’s not at all simplistic to just always be making a gift of helpful tips men and women have been selling. We take into account we now have the blog owner to appreciate for that. The main illustrations you have made, the straightforward web site navigation, the relationships your site assist to promote – it is most exceptional, and it is assisting our son in addition to us know that this matter is fun, and that’s extremely essential. Thank you for all the pieces!
And l really appreciate all the support that l get from my readers. Thank you.
I’d like to thank you for the efforts you’ve put in writing this blog. I really hope to check out the same high-grade content by you later on as well. In truth, your creative writing abilities has encouraged me to get my own website now 😉
Thank you.
An outstanding share! I’ve just forwarded this onto a coworker who was doing a little homework on this. And he in fact bought me lunch simply because I discovered it for him… lol. So allow me to reword this…. Thanks for the meal!! But yeah, thanx for spending some time to talk about this matter here on your website.
What can l say!